IC2Backup
help
V 2.01 / April 2022
Click here to download a new version, please close IC2Backup before executing your download. If a new version has been released, this is shown in the title bar.
With IC2Backup you can create zip files of directories with data or individual files to backup your data, and if you want, password protect the backup and/or send it to a FTP/SFTP site.
Short procedure
Select the type of backup you want to make; the previous backup type is pre-selected. Select or change the name and disk location, and set a password if desired. Select Start to select a predefined set of data (stored in a so-called xml file) to zip. Select Files allows you to open the (xml) file with the current files to backup and change the selection (file, file-only folder or all subfolders), or create a new one. IC2Backup can color folders/files that have changed over a period of time as an aid to selection. You can send the backup to an (S)FTP site with the FTP button or automatically after the backup is created.
Note that a zip backup won't be able to restore a full disk and/or most installed programs. For that you need an image creating program resp. the need to re-install the program using it's installer. Usually programs aren't included in a backup, you may select some settings files in program directories however.
Language selection
![]()
Click the Dutch (NL) flag for Dutch or the British flag (EN) for English. The currently selected flag will have a lighter blue background and the value is stored in the registry so it will be selected again the next time. Clicking a flag directly changes the language, also in the current screen.
This program is created by IC2 Innovative Computer Consultancy
Before you can make backups, you must select files and/or folders that you want to backup. Press the Select files button. You will see this window:
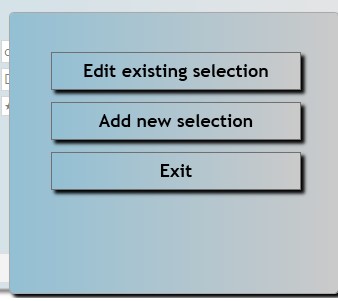
To modify an existing selection or create a new selection based on an existing one, choose Edit existing selection and select the .xml file you want to modify. Note that opening an existing selection can take considerable time because all directories are expanded up until the deepest included level. If you want to make a new selection (or if you don't already have an existing selection), choose Add a new selection. Exit cancels the option Select files.
A new window will open. The program will show you the drives on your system. If an existing selection is chosen, the selected folders or with selected data are shown expanded, so you can quickly see what you've selected.
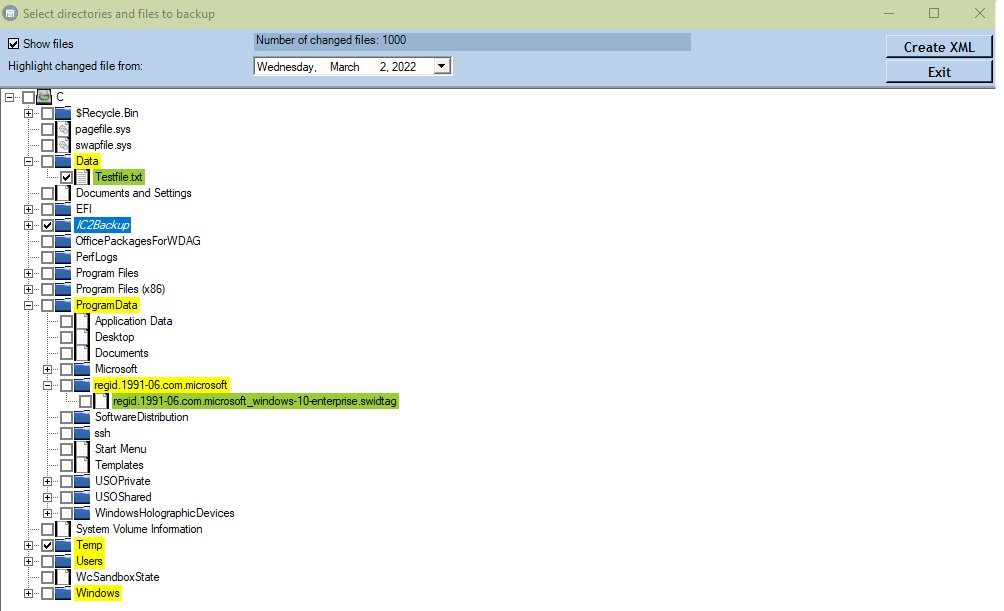
You have 3 options for selecting data:
If you want to change an existing selection or make a new selection based on an existing one, select the .xml file you want to change. Note: opening an existing selection can take considerable time because all directories are expanded up until the deepest included level. If you want to make a new selection (or if you don't yet have an existing selection) just click Cancel on opening the xml file. A new windows is opened. The program will show you the disks on your system. If an existing selection has been chosen, the directories selected or containing selected data show expanded so you can quickly see what you have selected. For selecting data, you have 3 options:
Select a directory by clicking the checkbox will select the directory and all it's contents. A full (recursive) selected directory shows bold.
Select a directory by clicking the checkbox while keeping the Ctrl key pressed will select the directory with it's file contents but without subdirectories. A selected directory without subdirectories shows italic.
Select individual files by expanding the tree until you see the required files. You expand a subdirectory (node) by clicking on the + in front of it. Selected files will just have the checkbox checked. To select individual files, make sure the checkbox Show files on top of the window is checked (this is the default) when expanding disks. Unchecking this box, if you don't want to select individual files, will speed up expanding directories.
To help you select data, IC2Backup can indicate which data have been changed. To use this feature, first decide about a date from which changes must be selected and enter it in the date field on top of the window. You can e.g. decide that directories/files not changed before 1 month ago do not need to be backed up. You have to start the search per individual disk. Right click on the disk and select Highlight changed items since chosen date for this disk from the context menu that opens. Collecting the files will take some time, on a slower disk with many files it can take a few minutes or longer. Once the text in the top of the program changes from "Collecting changed files from X:\" (background red, where X is the selected disk) to "Number of changed files: xx" (regular background) the process is ready.

Now any directory containing changed files in the chosen period has a yellow colour. The program has opened subdirectories to show the deepest level of changed files, click on the + to expand, this can take a long time if the directory contains (ten)thousands of files. The individual files which are changed are coloured green. This information can help you quickly decide to check the directory or individual files to be included in the backup.
Note that this is just an indication; you may for example have a directory where you store letters you print while not creating one for months. This directory must be added in the backup but will not colour yellow if a shorter period Changed was chosen. Also you may find a file changed within the chosen period like a program's log. If you need to recreate your system (e.g. on a new Pc) you just reinstall the software and most likely won't need the log from your backup. But you may want to restore files containing scores, settings, etc., and these can be stored in a program directory. Repeat the process for every mbol. IC2Backup also allows you to open a file by double clicking on it. You always need to confirm that you want to open the file. Opening a file requires a program assigned to open that type of file, e.g. a PDF viewer on a PDF. Double clicking on a directory opens a Windows Explorer with that directory.
Once you are ready click the button Create XML on the top of the window. If you opened an existing XML file, do not change the filename and confirm overwriting, the previous selection will be copied with .bak added to the name. If you want to revert to the previous version, you can use Windows Explorer to manually rename the file to any yet non existing name ending on .xml. Assigning a new name allows you to modify an existing selection while also keeping the previous. If you created a new selection, the default name is NewSelection.xml which you usually change to a more meaningful name.
Note that IC2Backup does not store the drive letter directly
from which the backup is made. This would be incompatible with Explorer. If
files are added from the same directories and the same names but from different
disks both files will be included, however it is possible to see from which disk
they came in programs showing the file entry comment, like 7-zip.
Making a backup
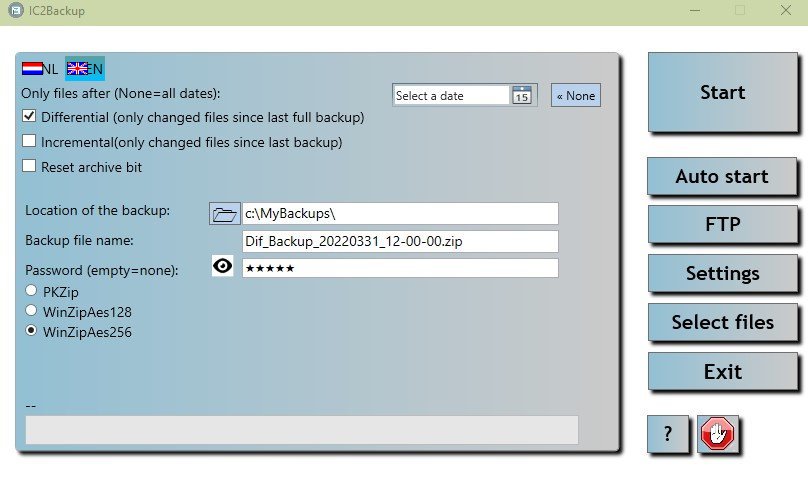
First make sure that the program is set up to create the kind of backup that you want. Some default choices can be determined using Settings but can always be modified. A normal pattern is to create a full backup and check Reset archive bit. All files in the selection will be added to the zip backup file and the archive bit will be reset. Windows sets the archive bit again once a file is changed. This allows you, instead of making a full backup every time, to create a differential or incremental backup for a while.
Only files after This is used as soon as you enter a date. If you checked Only changed files since yesterday yesterdays date will be filled in (which can be changed). This option can be used "stand alone" or combined with the next 2 options. Click the button <<None to clear the date so no further date checking takes place.
If you check Differential, only those changed files will be added in the backup. The archive bit will not be reset (if checked it will be unchecked by this option) meaning that a next differential backup will also contain files from the previous differential backup, whether or not they were changed since. That allows you, when you need to restore a backup, to start with the last full backup and then overwrite the last differential backup. Earlier versions of files can still be accessed in earlier differential backups. Also note that if you use other backup programs, clearing the archive bit can be done by those programs so files are no longer included in differential backup created by IC2Backup.
If you check Incremental, only those changed files will be added in the backup. The archive bit will be reset (if unchecked it will be checked by this option) meaning that a next incremental backup will only contain files changed since the last full or incremental backup. Multiple backup zip files created with Incremental will be smaller than multiple Differential backup zip files as later created zip files do not contain unchanged files already in earlier zip files. However, when you need to restore a backup, you start with the last full backup but you will need to overwrite with all incremental backups since that last full backup, from old to new, to get the same situation as in restoring using a differential backup.
Reset archive bit will reset the archive bit for files added to the backup. This means these files won't appear in the next backup unless changed. This is the normal setting for Incremental backups and should be used for Full backups.
Do not check anything or enter a date to include all data in a specific xml selection.
Next, select a location where to store the backup; you can click the map symbol button to select a directory, and the filename. Default this is called Backup followed by the date and time, which is reset to a name with the current date/time after making a backup. Do not change the extension (.zip). When choosing Differential/Incremental or Modified after a date, Dif_/Inc_ resp. that date (also as yyyymmdd) is added before the name (and also removed if you change your choice). Do not change the extension (.zip). You can change the name yourself.
You can create a password protected zip file. Once you start typing a password, a "eye" button appears in front of the field and it will show star symbols instead of what you type so anyone watching will not see the password. If you keep the "eye" button pressed it will show you the password until released. Note that a zip file created with a password filled in can not be accessed without this password! So you must make sure the password is stored somewhere saved or you are you sure you remember it for later unzipping.
The default password protection mode is WinzipAes256. This is the hardest to crack. The PKZip mode is the easiest to crack but it is the only protection mode which allows you to open the zip file in Windows Explorer by typing the password. Windows Explorer can not open Winzip128/256 protected zip files. You can open all 3 files by programs like Winzip or the free program 7-Zip.
Pressing the button Start (or Ctrl S) will locate your directory with stored selections (.xml files) so you can select the required xml file; the default file entered in Settings will be preselected. The zip process starts and a progress bar will show you the collection of files (every file included will be shown) plus the estimated remaining time for the zipping and separate, the FTP time. The text above the progress bar will change to Ready and it will show the time it took to create and/or upload the zip file (indicated as (ZIP) and (FTP) and the name + location of the zip file.
Other options
Auto start
Auto start will show you the time as set in Settings which can be changed, using the format HH:MM:SS (hour, minute seconds). If you set a time, the program needs to stay open and it will then start the backup, using the current settings (including a pre-selected XML with data to backup) on the time set. Auto start will show in italic. Should you want to cancel the Auto start before the time selected, just press the button again. Auto start will show normal again.
FTP
This button will transfer the backup zip file you just created to the FTP site as defined in Settings. A progress bar shows the progress of the upload. If you did not first make a backup after starting IC2Backup, IC2Backup will let you select an earlier zipfile. Note that in settings you can also let the FTP transfer follow the creation of the backup.
The ? question mark button shows this help file.
The red Stop button with the hand inside stops the collection of files, adding to the zip file or sending a file with FTP. After pressing Stop you can simply start another backup. If you start the same backup again it will start over. You have to use this button first if a backup is in progress before you can close the program using the Exit button (or the Windows close button).
Settings
On first use, IC2Backup will warn that there is no setting file. Go to Settings, enter your settings and click Save.
It is possible to define up to 9 different FTP settings file. These will be called IC2Backup1.xml-IC2Backup9.xml.
Creating a new setting file
Click the Copy
button ![]() at the top of the screen. Any existing values will remain but the number
(left to the button) will be set 1 higher. Make any changes you want and click
Save. The new setting file has been created.
at the top of the screen. Any existing values will remain but the number
(left to the button) will be set 1 higher. Make any changes you want and click
Save. The new setting file has been created.
Selecting one of the setting files
Use the
arrow keys
![]() to select the required files. You can browse through all existing
files. When you exit the Setting window, the currently selected setting is used
and also stored in the registry. The next time you use the program, that setting
file will be selected again.
to select the required files. You can browse through all existing
files. When you exit the Setting window, the currently selected setting is used
and also stored in the registry. The next time you use the program, that setting
file will be selected again.
If you browse to a next or previous setting file or click the Exit button after having changed something, IC2Backup will ask you if you want to save. Click Yes to do so and proceed, click No to proceed without changing and click Cancel to return to the current setting file.
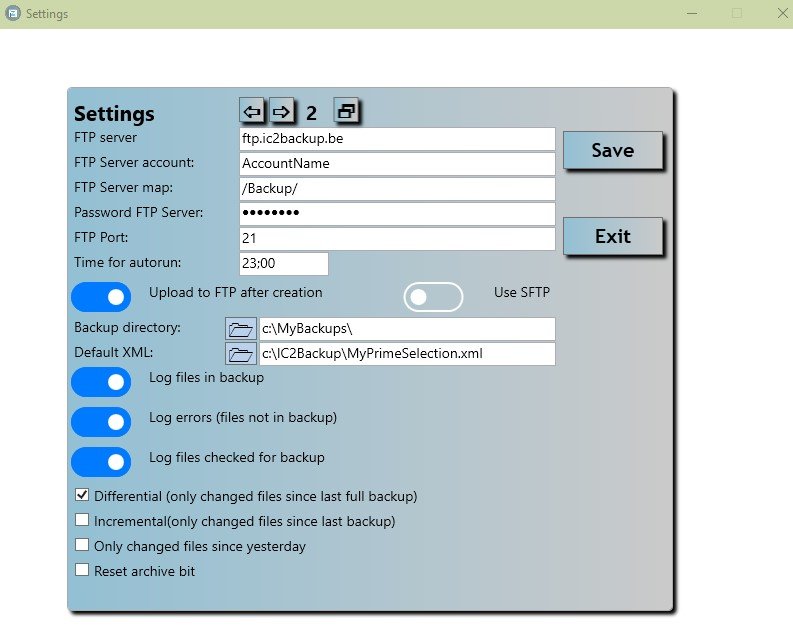
FTP settings
FTP Server: enter the ftp servername or IP address, e.g. FTP.MyDomain.com
FTP Server account: enter the ftp server account name as assigned in your hosting, e.g. MyFTPName
FTP Server map: enter the ftp server map name. Some FTP accounts are directly defined in a certain map. In that case, do not enter anything. Otherwise, it could be something like /MyBackups/
Password FTP server: enter the password of the FTP server. The password is not visible when you type it and it will be stored encrypted so it can not be read when someone opens the xml file with an editor.
FTP Port: enter the FTP port used. Normally that will be 21. IC2Backup tries to get the used port from the connection information, if supported.
Upload FTP after creation: if switched on, the FTP upload will take place automatically when the backupfile is ready.
Use SFTP: if switched on Secure FTP is used. Technically this is not really FTP, but it is used for FTP like operation, e.g. programmatical access to WebDav cloud sites.
Other settings
Time for autorun: if you keep IC2Backup open and select autorun, the default time to start the backup entered will be retrieved from what you enter here. E.g. 23:00.
Backup directory: Enter or select the default directory of your disk where you want to store the backup. It is set as default and can be changed in the main screen before making a backup. E.g. c:\MyBackups\. You can use the button with the map symbol to select an existing directory.
Default XML: Enter or select the default xml file (containg the selected data as set in Select files) which you want to use for you a backup. You can use the button with the map symbol to select an existing xml file. If you Auto Start a backup, the file currently selected will be used and if you manually open an XML file, it will suggest this file but you can still select another file.
For the next 3 settings note that switching one or more on can let these files grow in size significantly. You may want to delete them once in a while, or remove older content using a text editor. Note that some information, like files not in backup, are as reported by the underlying zip component, e.g.
The process cannot access the file 'C:\ic2backup\FilesChecked.txt' because it is being used by another process. (exception during zipping/2)
Files which are open are sometimes skipped, the chance that this happens is higher when the files are exclusively in use. Although most files will backup even if you got your programs open when creating a backup, it is recommended to close all other programs. This also prevents that some files are up to date and others are not because a couple of changes were being applied to different files at the exact moment IC2Backup is adding these files to the backup.
Log files in backup: this will add your backup details to a file in your program directory called FilesInBackup.txt. It starts with the date & time, then the type of backup and directory and name of the backup file, and adds all files which have been added to the backup
Log error (files not in backup): this will add your some errors and file details of files not added in the backup to a file in your program directory called FilesNotInBackup.txt. It starts with the date & time, then the type of backup and directory and name of the backup file. If that is all you see, no files failed to backup. This is a recommended setting as checking the file after backups prevent that files which did not backup remain unnoticed.
Log files checked for backup: this will add all files in your selection and either shows if the file was in the backup or not, with the reason (archive bit not set or not within date range), something like this:
(In backup): 18061 c:\MyData\MyFile.txt
(Not in backup-archive): 2 c:\MyData\MyOlderFile.txt
The next 4 options, Differential, Incremental, Only changed files since yesterday and Reset archive bit correspond with the options in the start screen. IC2Backup will set these options according to your choices in the selected settings, but you can still change any of the options before starting the backup. Note that Only changed files since yesterday will set the date to yesterday's date.